


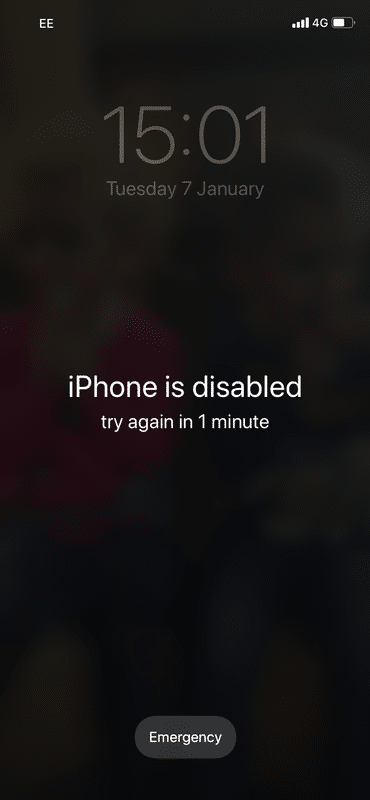
This article is for when your iPhone or iPad displays the error message “iPhone is disabled connect to iTunes” and nothing happens when you try to go ahead with the syncing procedure.
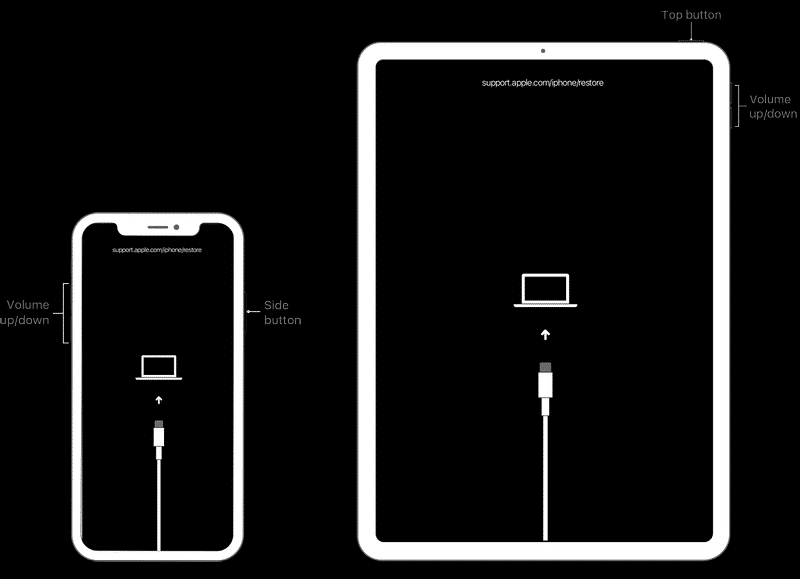
It is also possible that your iPhone has bricked during a failed update, and it won’t respond or react in any way when plugged into your computer. In this case, try using iTunes software as described below:
- Download iTunes setup from the official download page. After doing so, run the file and install the software on your PC or Mac, depending on which version you need.
- Launch iTunes on your PC or Mac.
- Once opened and when iTunes detects your iPhone, then you will be asked to put in a passcode, if you have set one up. If not, iTunes will ask for your Apple ID and password so that it can confirm that you are the owner of the device. After which, go ahead and click on “OK” since this is why you are here in the first place.
- Now you will see a dialogue box. Click on “Restore iPhone”.
- iTunes will then check for the latest software version, and click on “Download and Update” if it is available for your device. If not, you can go ahead and choose any other version that is available.
- Once the download has completed, iTunes will start restoring your iPhone to its factory state. When this process completes, your iPhone should be functioning again as normal and should be able to be seen by iTunes without issues when you try to connect it in future.
As mentioned, this works for devices that are bricked by failed updates. But if your iPhone is still working and you have no issues with it, but you just want to update to the latest version of iOS, then try the following:
- Download an iOS update tool.
- Let your iPhone charge up sufficiently until no green light shows when plugging into a power socket.
- Open iTunes on your PC or Mac and click on “Check for Update” button or “Check for Updates” depending on which version of iTunes you use with your device (11 or 12 are compatible).
- You will be asked to insert an Apple ID and password, if you have not set one up. If so, iTunes will then try to connect your device. However, if the connection is unsuccessful, then you will receive an error message that says “Could not connect to the iPhone” or something similar.
This means that your device does not support the latest version of iOS and it will need a software update instead, which we cover below.
- On the “Update” page in iTunes are symbols for each of the available updates available for your device. Tap on one of them until iTunes finishes updating.
- Wait for the update to finish, and then try to connect your device again in future via iTunes.
The above process will solve the problem if you have a non-supported version of iOS on your device. However, if you are trying to update to iOS 10 or later but are encountering the error message “iPhone is disabled” because of an existing passcode or TouchID lock on the device, then you can follow these steps below:
- Launch iTunes on your PC or Mac and click on “Check for Update” button or “Check for Updates” depending on which version of iTunes you use with your device (11 or 12 are compatible).
- Select “Check for Update” on the “Update” page, and then you will be prompted to enter your Apple ID and password if you have one set up.
- You will then be asked to plug in your device into the computer.
- iTunes will automatically download and install any software update available on your device, once this process is complete, you will receive a message indicating that there are no further updates available for you.
If the above failed, then follow these steps instead:
- Ensure that your iPhone or iPad is still connected to iTunes after performing the steps above to check for any updates.
- Click on “Check or Repair” button.
- If you see a message on the screen saying “iPhone is disabled”, then mark “Update” and click “Continue”.
- You will be asked to enter your Apple ID and password if you have one set up. If not, click on “Create New Account” link, this will create one for you and authorize the software update with your account.
- Once done, click on “Continue” since this is why you are here in the first place.
- On the next page, you will see a list of all available updates available for your device along with an estimate of how much space each update requires (Unless there are more than 20 available updates).
- Check off the ones you want to install on your device and then click “Install” or agree to the terms and conditions.
Once this process is complete, you may now connect your device to iTunes and update. If the update fails, just try again until the problem is resolved.
